With most of the country on quarantine the last several weeks, many dance and fitness companies have switched to offering classes online, including me. In March I began offering weekly dance classes via Zoom to keep the connection going with my students during a stressful time. Since then I’ve taught over a dozen classes and have learned from many mishaps along the way.
I’ve been doing virtual meetings in corporate America for over a decade now. Hosting a virtual dance class would be no big deal, right? Wrong. Absolutely wrong. Running a dance class online is nothing like running a meeting as you’re balancing voice instruction, music and active video. Here are my biggest lessons from teaching virtually on Zoom (some lessons apply to any meeting tool). I hope to save the next dance teacher or fitness instructor from my misfires.
1. Mute is Your Friend
The number one thing to do when running a group class is mute everyone upon entry. Not only does this help you focus on running the class and not John’s roommate flushing the toilet in the background, it also improves the audio experience for everyone involved. When you have multiple people making sound at once, Zoom will often reduce the volume on most to highlight a single speaker. You might not be the one everyone can hear.
In the studio students can ask questions and enjoy the collective energy that comes with a group class. You don’t have to lose the camaraderie all together. Take a few breaks throughout the class to get up close and personal to your screen and connect with your students. Allow them to unmute and ask questions. You’ll also be able to see their facial expressions to know if they are absorbing your class or struggling and thinking “never again”. With these structured breaks, you get a taste of the connection you had in the studio without compromising the overall class quality.
2. Set Yourself as Spotlight Video
As soon as you have three people on video, set your video to spotlight video. This way, regardless of who’s talking or if the audio jumps, you will appear in large format to your students and they can better see your teaching. Your students can always change their personal screen to gallery view to see all the other attendees, but the default will be you. This also takes the onus of “pinning” your video off the student who may or may not be Zoom savvy.
Also keep in mind that most people are joining your class from a computer, phone or tablet (there are a few with fancy tv hookups but they are the minority), so make sure that your moves are big and small-screen friendly. Otherwise your students will spend more time squinting at the screen than learning your routine. Here’s how to set yourself as spotlight video.
3. Share Computer Sound for Better Audio
Now this one’s a biggie! When you’re dancing, it’s common to play the music out loud for your computer microphone to pick it up. It usually will, but your music will sound like it’s being played on a Walkman that’s been hit by a car. It can be hard for your students to follow choreo when they can barely make out the beat. If you’re calling out instruction while the music is playing, Zoom will reduce the sound for either you or the music. Making the music sound wonky with drops in volume throughout.
Play your music on your computer and use the setting, share computer sound. This will allow your students to not only hear the music in all its mp3 glory, but they will have better control of adjusting the volume on their end. This also helps when using a mic as I’ll discuss below.
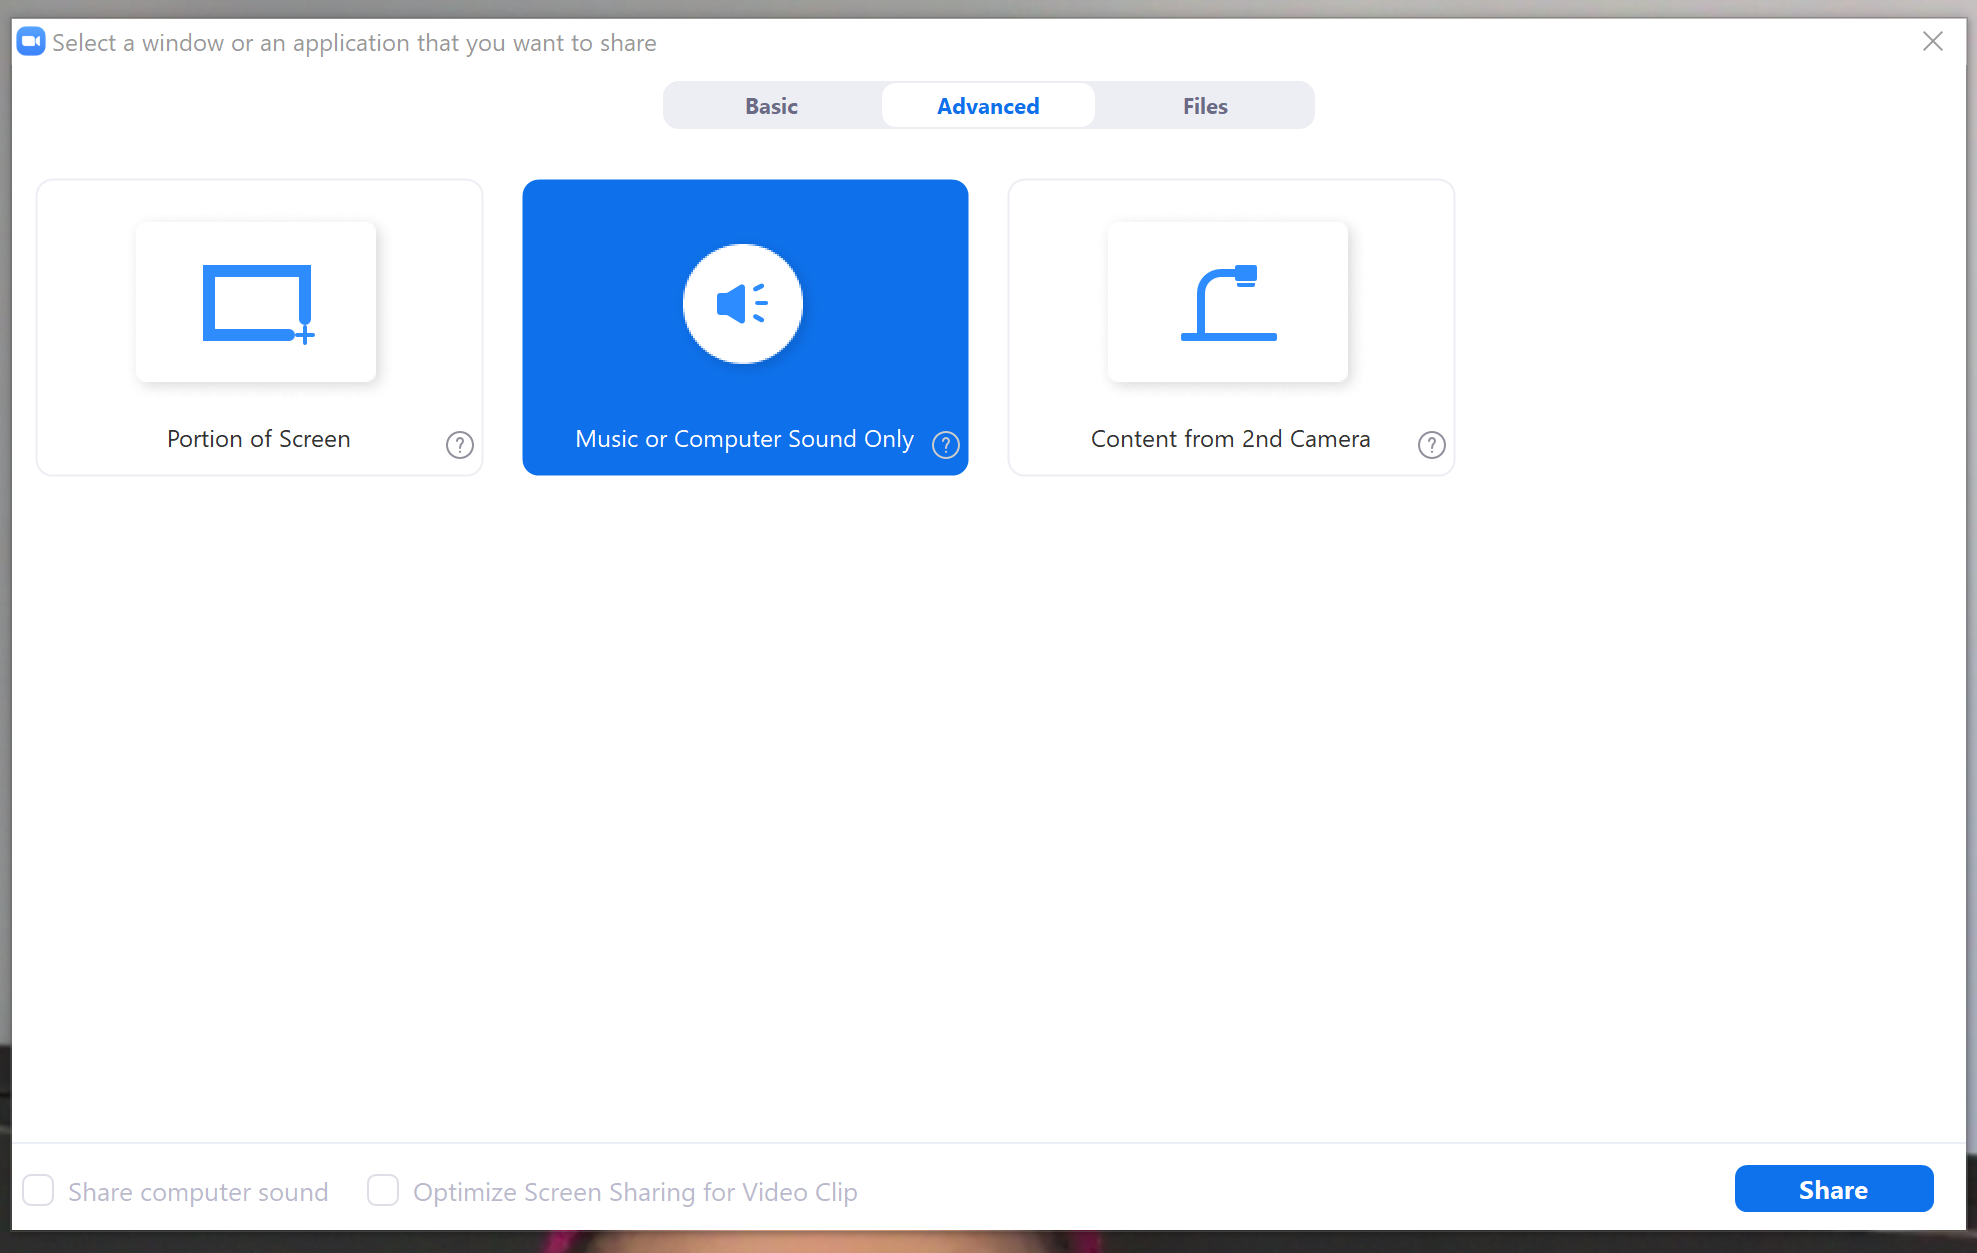
How to Access Share Computer Sound
4. Mic Check 1, 2, 1, 2
Just as important as sharing computer sound, using a mic can be a game changer. And no, you don’t need a fancy set of inner ears or boom setup. A pair of simple Bluetooth headphones with a mic should do the trick. I use these MPOW headphones which have clear audio output, are great at picking up sound (my voice tends to run quiet, but people can hear me fine), and are noticeably light.
Make sure your computer is using your headphones for both input and output so that you can hear the music through your headphones so that your mic isn’t picking up the music from your background since you’re sharing audio through your computer directly. You can blast the music as loud as you need to in your ears without compromising your vocal instruction as you speak into the mic. Your students should hear a nice blend of both through their speakers.
5. Bring Back Up (People and Devices)
It has been incredibly helpful having my sister on my classes as a designated admin. While I am focused on teaching, she admits late students, monitors chat and provides technical support. She provides me with honest feedback on the class which I can’t get on my own. Can you see certain moves based on the size of the screen and the placement of my camera? Did the audio speed or the video freeze? Often these things happen without your knowledge because everything looks fine on your end but isn’t transmitting properly.
She is also better eyes on the students throughout the class. Letting me know if they were following and having fun or seem lost. I sometimes have 15 people in my class so there’s no way I can see their faces (I’ve also worn glasses for 30 years and can barely see in general). I can’t get the same direct feedback from seeing them in the studio while dancing, so she helps bridge that gap.
When you switch off your Zoom screen, your video feed stops so I’ve found running my classes on two devices extremely helpful. I use my iPad as my camera and once it’s set at the right angle, I don’t have to touch it and risk shifting the camera. I keep it set to me on the screen so I can see myself sans mirror. It’s never connected to the meeting audio. I then connect my computer to the Zoom meeting for audio. My headset is Bluetooth connected and I have my music apps up. I use share computer sound on that device to feed both my music and my instruction into Zoom simultaneously. I can set up my audio anywhere in my room that’s convenient for me to reach without affecting my video screen. Plus just having multiple devices ready to go helps as software crashes, apps don’t open, and devices die.
6. Be Multi-Space Friendly
This is the easiest to forget. Your students are taking your class from home and could be dancing on carpet, tile, hardwood or outside on concrete. They could be in a basement or in an apartment above another tenant. So, keep those things in mind when planning your choreography. Moves that involve jumping or quick adjustments on and off the floor should have alternative options, especially if your students are beginners and less accustomed to adjusting the choreography to match their surroundings. The last thing you want is for someone to try to spin in sneakers on high pile carpet and accidentally injure themselves. If your students are more advanced, then they will often naturally make the adjustments accordingly, so you have more creative flexibility.
7. Zoom Will Fail You
Ultimately no matter what you do, Zoom is going to fail you. The entire world is quarantining at home and with so many people using Zoom, quality will be diminished. There will be times where your video freezes or the system glitches and you’re suddenly 1 to 2 seconds delayed in video, but your audio is playing fine, so you look off beat. Your class may buffer or drop audio completely. This is just par for the course. The best way to combat that is having that back up person as mentioned earlier to keep you informed. If your video drops out or you freeze for a few seconds, you may not know because it’s not your computer that’s glitching but a network connection issue. Your backup person can jump on and say, hey we lost you for that last run through, can you do It again?
I hope these tips proved valuable to you as you navigate your virtual class journey. I don’t know when this quarantine craziness will end but it does not need to hamper your dance and fitness classes. Enjoy the challenge and adventure. You can also use this as an opportunity to connect with new students who are not geographically capable of taking your classes, ultimately expanding your reach. But no matter what, stay home, stay safe and stay dancing.

Written By: Tyria Saul
Tyria was born dancing and at age 5 began officially taking lessons. After studying ballet, tap, jazz, african dance, and lyrical at schools around the Greater Philadelphia area including Folcroft Dance Center (PA) Christina Cultural Arts Center (DE), Academy of the Dance (DE), and Rosina School of Dance (NJ), Tyria took a step away from the dance floor at age 19. Six years later she would fall back in love with dance in the hip hop class of Sammy Reyes at Koresh School of Dance in Philadelphia. Starting back as a way to release stress, dance became a source of freedom for Tyria. Tyria is a performer for Sanbrooka Productions in Philadelphia and the Philadelphia Community Tap Project. She has taught hip hop and heels with DivaDance PHL and is excited to share a dance floor with you!